17th Lancers, The Charge of the Light Brigade
Mounted trooper of the 17th Lancers just prior to the ill fated charge of the Light Brigade at Balaclava in 1854
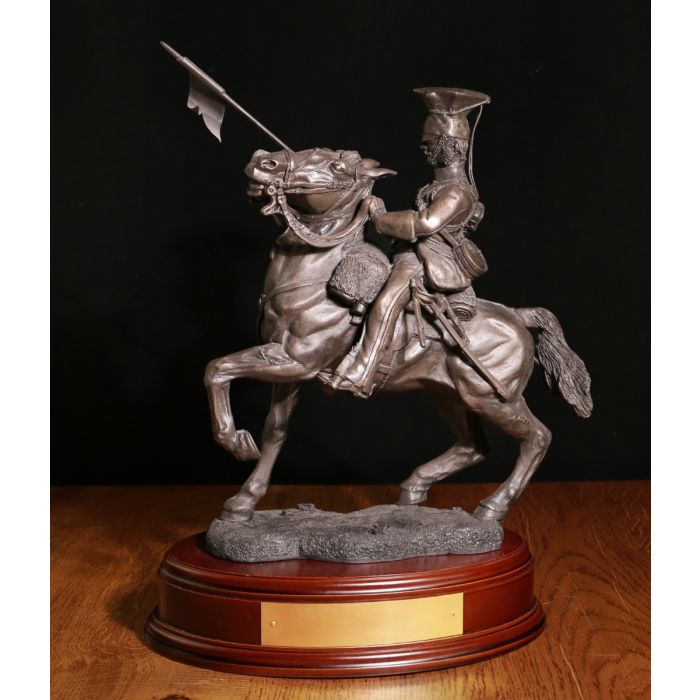
17th Lancer (Duke of Cambridge’s Own)
“The Charge of The Light Brigade”
Balaclava 1854
On the morning of the 25th October 1854 the 17th Lancers as usual ‘Stood To’ at dawn. As the light improved it became clear that a sizeable Russian Army was attacking the defensive line of six British redoubts to the north of the port of Balaclava. Both the ‘Heavy’ and ‘Light’ Brigades of British cavalry were deployed into threatening positions to the west of the Russian Army, with a brigade deployed in each of two valleys, Light in the North, Heavy in the South. By the time the Cavalry had taken up position the Russians had captured four of the redoubts and a large mass of their cavalry were moving south towards the Port with only the 93rd of Foot in their way. In and action, later to be commemorated as the “Thin Red Line”, the 93rd held, forcing the Russian Cavalry to retire north across the front of the Heavy Brigade. These cavalry, with the Greys and Inniskillings leading charged the milling Russians forcing them to retire in disorder.
Meantime, Lord Raglan, the British commander noted that the British cannons in the captured redoubts were in the process of being dragged away by the Russians and issued orders commanding The Light Brigade to advance “rapidly”, up the valley towards the lost redoubts with the aim of recapturing the guns. The order was poorly written and from Lord Lucan, the cavalry commander’s view in the valley below Raglan, was unclear. He passed the order to Lord Cardigan, commander of The Light Brigade. After consultation with Captain Nolan, Raglan’s messenger, Lucan ordered Cardigan to attack the only guns he could see, those in the valley floor directly to his front.
Cardigan’s Light Brigade were formed up in the standard textbook formation, three regiments in the front or “First Line” and two in the second or “Reserve Line”. The 147 men of the 17th Lancers were in the centre of the First Line, with the 11th Hussars on their left. As the charge commenced the valley narrowed forcing the 11th to drop back into a middle or “Support Line” position. Directly to the Brigade’s front were the field Batteries of 6 Don Cossack Horse Artillery who became the objective. The attack picked up great speed with the First Line under heavy cannon fire, (although taking few casualties) from three directions. The 17th Lancers with the 13th Light Dragoons quickly succeeded in reaching the enemy guns, soon after to be joined by the 4th Light Dragoons and the 8th Hussars of the Support Line who all set about disposing of the enemy gunners. The Artillerymen in panic, fled through the Cossacks of Rijoffs Brigade behind. These in turn, having just been mauled by the Heavy Brigade in the South Valley, turned and bolted. The 11th Hussars, on the left, by-passed the guns to attack the fleeing Russians.
As the momentum of the charge dissipated, the tide of battle turned. The Light Brigade, unsupported, were forced to withdraw and it was now that the major losses were incurred. The survivors, mostly dismounted and in disjointed groups hacked their way back through the enemy guns to be exposed to enfilade fire of the Russian flanking artillery. Casualties were severe with the 17th suffering most severely with only 72 of their number returning to the British line alive.
The sculpture depicts a Corporal of the 17th Lancers preparing to move off at the beginning of the ill-fated action. His Lance, which is his primary weapon, was twelve feet long and designed to spear an enemy before he could infict a blow on either the rider or horse. In open skirmishing, particularly with enemy cavalry, Lancers were devastating, however in close, or confined combat the lance soon became a hinderance to be discarded in favour of the sabre.
Our collection of Lancer Cavalry figurines make great gift ideas for service and ex members of the regiment. They make great gifts and presents and are ideal as christmas presents, anniversary presents, fathers day gifts, birthday gifts and as commemorations.
In an effort to be more sustainable we've had our outer packaging redesigned to be fully recyclable. Every statue comes in a simple elegant printed brown box with printed fabric tape.
Inside the box the statue will be protected with bubble wrap and special foam bags to minimise the chance of damage in transit.

All our statues include an optional engraved plate on the wooden base. On the bronze statues the plate is jewellers brass and the pewter/ silver statues have a nickel silver plate.
To add a plate to your statue please select the option above and enter your engraving details. Please note if the engraving is left blank no plate will be included. If you'd like a blank plate please write this in the engraving details.
Please DOUBLE CHECK the engraving as mistakes will require a new plate to be made.
On the engraving the text will be centred and the font sized to fit the plate.
| Product Code | B16a |
|---|---|
| Price Code | FK |
| Sculpting Scale | 8" |
| Base Material of the Statue | Cold Cast Resin |
| Height Including Presentation Base | 13" / 33cm |
| Width with Presentation Base | 8" / 20cm |
| Depth with Presentation Base | 6" / 15cm |
Please be aware that these measurements are not exact and have been rounded for ease.
As every item is individually handmade the exact dimensions may vary slighty.